
Have you ever “subscribed” to a blog? You know, you give them your email and then each time there’s a new blog post it magically appears in your inbox? How the heck do they do that? It’s probably some high-tech hocus pocus, right?… Wrong.
In this post I’m gonna explain which system I use to automatically email my latest posts to an email list and take you through the steps to set it up yourself.
Follow along and we’ll have your blog posts hitting inboxes in no time. Let’s get started, shall we?
Why You Should Email Your Latest Blog Posts
Often, what happens when someone comes to your blog is that they’ll read one post, get what they came for, and then go on their merry way. Maybe they came across a link to your blog on Pinterest or just happened to land there from Google. They’ll close out of your site and forget about you.
But what if they really liked your therapy blog and would genuinely enjoy reading more of the awesome content you create? You’d want to give them a way to know when new blogs are posted and a way to keep coming back to your website.
Creating an email list and allowing your readers to subscribe to your blog is a great way of doing that. It can give potential clients a way to know you better, see your expertise and hopefully schedule an appointment. And it can be a great way to drive traffic to your site over time.
So, Which Email Service Should I Use?
Well, that’s really up to you and the goals you want to accomplish with email marketing. Personally, I prefer MailChimp and here’s why:
- It’s free as long as your email list is under 2,000 names
- You can easily create sign up forms that you can embed in your website
- I love love love the brand, design and ease of creating email campaigns
- I’ve been using them since 2010 and they just keep improving
Honestly, the price point for MailChimp is what first brought me to them. And if you have a low budget (mine is zero because I’m still growing my blog) they are a great choice. And they have all the functionality needed to detect when I post a new blog and then send it out to my list.
Do a little research though. Other email clients and services you can use are GetResponse, AWeber, or Feedburner (Feedburner can auto-send your posts for free, but it’s not a robust email marketing tool like the others).
How to Automatically Email Your Latest Posts Using MailChimp
Let’s go through the steps to set up your latest post email via Mailchimp.
Create a MailChimp Account
- Head over to Mailchimp’s website and create an account.
- Click on the button ‘Sign Up Free’
- Fill out the form with your email, a username and a password and click ‘Create My Account’
- Head to your inbox and look for the email they just sent you, the subject should be ‘Activate your MailChimp account’
- Click the big button in the email ‘Activate Account’
- Click the checkbox on the Captcha form to prove you’re human
- Click the button ‘Confirm Signup’
- Fill out your profile (some of this info will appear in your email’s footer)
- Click ‘Save and Get Started’
Boom. You’re all set up with a MailChimp account.
Create Your First Email List
Now that you’re all set up, you should be looking at the MailChimp dashboard. From here, we’ll create our first email list. This will allow you to collect the emails you’ll send your latest post to later on.
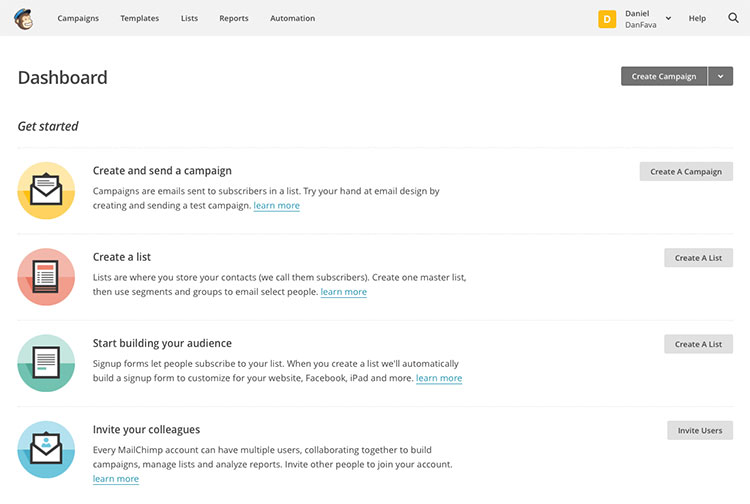
- Click ‘Create A List’
- Click the gray button ‘Create List’
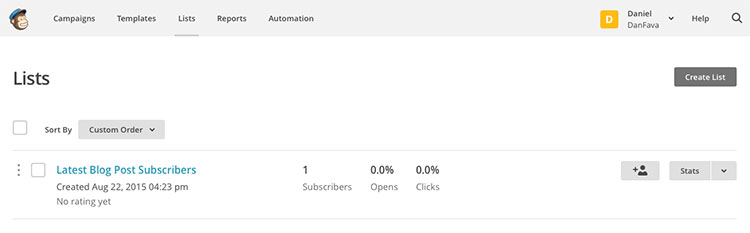
- Fill out the information about your new list. For list name, I like to use something like “Latest Blog Post Subscribers”.
- You’ll be taken to an overview of your new list where you can manage the details
- Add your email address to the list (so you’ll know it’s working) by clicking on ‘Add Subscribers’ then ‘Add a Subscriber’ in the dropdown
- Fill out the form with your info
- Click ‘Subscribe’
Now, Let’s Create Your Automatic Email Campaign
We do this in the ‘Campaign’ section of MailChimp
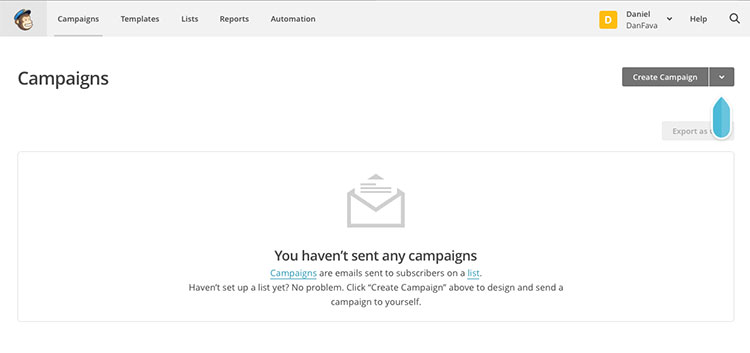
- Click ‘Create Campaign’
- Click ‘RSS Driven Campaign’
- Enter your blogs feed url, it should like this: http://www.yourwebsite.com/feed
- Enter the frequency and time you want to send your emails
- Click ‘Next’ in the lower right corner
- Choose the email list you want to send it to and check ‘Send to entire list’
- Click ‘Next’
- Fill out the information for your campaign. Mailchimp will use RSS values to pull in information about your blog feed. For example, *|RSSFEED:TITLE|*will look at your feed and come back with the title of your feed.Here’s what I use for my email subject: *|RSSITEM:TITLE|* | Create My Therapist WebsiteSo for this blog post it would read ‘How to Automatically Email Your Latest Therapy Blog Post | Create My Therapist Website’
- Click ‘Next’
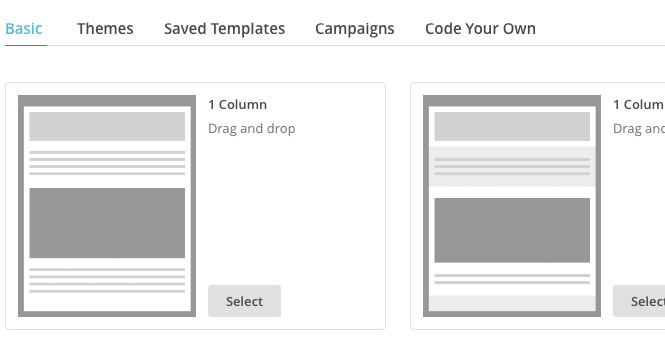
- Here’s where you get to choose a template. For the purposes of this tutorial, click the ‘Select’ button for the 1 Column layout under the ‘Basic’ templates
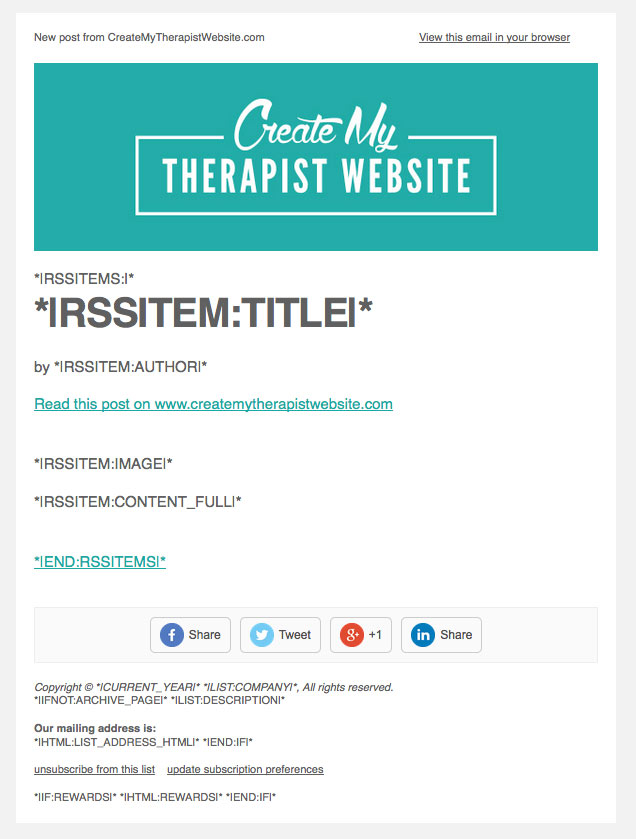
 You’ll then be in the Design section of your campaign. This where the fun really begins and you can make your email look amazing. It’s up to you how crazy you want to get. For reference, this is what my latest blog post email looks like:
- Click the ‘Design’ tab on the right side of the page to put in colors to match your website.
- Click on the text that says ‘Use this area to offer a short preview of your email’s content’ and update it to whatever you want. I like to use ‘New post from…”
- Upload a logo or photo where it says ‘Drop an image here’
- Click on ‘Designing Your Email’ to edit the body of your email
- On the right side panel, click on the code brackets <>
- Paste this code into the editor, updating your URL:*|RSSITEMS:|*
<h1>*|RSSITEM:TITLE|*</h1><p>by *|RSSITEM:AUTHOR|*</p><p><a href=”*|RSSITEM:URL|*”>Read this post on www.yourwebsite.com</a><br />
</p><p>*|RSSITEM:IMAGE|*</p><p>*|RSSITEM:CONTENT_FULL|*<br />
</p><p><a class=”mc-template-link” href=”http://inspiration.mailchimp.com”>*|END:RSSITEMS|*</a></p> - Click ‘Save & Close’
- Check out what it looks like by clicking ‘Preview and Test’ then ‘Enter Preview Mode’
- If all looks good, send yourself a test email by clicking ‘Send a Test Email’ in the ‘Preview and Test’ dropdown
- If the email looks good, click ‘Next’
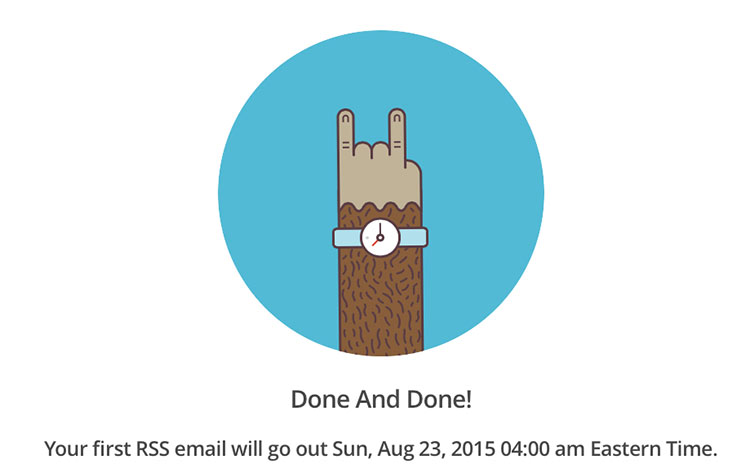
- Check all the details and make sure they’re correct, then click ‘Start RSS’Congrats! You’re all set up. You should be looking at this and feeling good:
Note: RSS feeds don’t automatically include featured images, so I use a plugin in WordPress called Featured Images in RSS w/ Size and Position
How to Add Your Email List Signup to Your Therapy Website
Stick with me just a little longer! Now that we have our automatic blog post email set up in MailChimp, we gotta get some people on your email list. We do that by going back to the ‘Lists’ section of MailChimp.
- Click on the title of the list you created for your auto email campaign
- Click on ‘Signup Forms’
- Click on ‘Embedded Forms’
- Under ‘Classic’, edit the details to what you want
- Copy the code in the box titled ‘Copy/paste onto your site’If your private practice website is built with WordPress, follow the remaining steps.Note: I’ve also had some issues with the Submit button not appearing in WordPress, the way to fix this is to delete ‘class=”clear”‘ from this code: <div class=”clear”><input type=”submit” value=”Subscribe” name=”subscribe” id=”mc-embedded-subscribe” class=”button”></div>
- Log into WordPress
- Hover over ‘Appearance’ and click on ‘Widgets’
- Choose the sidebar where you want your form to appear
- Drag and drop a ‘Text’ widget into that sidebar
- Paste your MailChimp form code into the text box
- Click ‘Save’
Ok! You should now have a working signup form in your therapy website’s sidebar. Any time someone enters their info into the form it will automatically be added to your email list in MailChimp. Then, any time you update your blog, they’ll get that goodness delivered right to their inbox.
If your website is not built with WordPress, try looking at the support section of the website service you use for information on adding HTML code to your website.
Well I hope this tutorial was helpful. If you download the cheat sheet below, you’ll get added to my newsletter and never miss an update.
[av_hr class=’short’ height=’50’ shadow=’no-shadow’ position=’center’ custom_border=’av-border-thin’ custom_width=’50px’ custom_border_color=” custom_margin_top=’30px’ custom_margin_bottom=’30px’ icon_select=’yes’ custom_icon_color=” icon=’ue808′ font=’entypo-fontello’ av_uid=’av-40sfjb’]
[av_sidebar widget_area=’Blog Post Cheat Sheet Opt In’ av_uid=’av-2i9zdz’]
Pin for later:

